Last Tuesday, I watched my neighbor Sarah through her kitchen window, frantically waving a dish towel at her smoke alarm. She’d been trying to recreate that perfect pan-seared salmon she’d had at a restaurant, but her butter had turned black and bitter within seconds. The fish looked more like charcoal than dinner.

Sarah’s not alone in this kitchen frustration. We’ve all been there – that moment when regular butter betrays us, burning before our food gets that beautiful golden crust we’re after. But there’s a secret weapon that professional chefs have been using for centuries, one that’s finally making its way into home kitchens across the country.
That secret? Clarified butter. And once you understand what it is and how to make it, you’ll never look at regular butter the same way again.

The Golden Truth Behind Professional Cooking
Walk into any high-end restaurant kitchen during the dinner rush, and you’ll notice something interesting. Those gleaming sauté pans aren’t filled with the same yellow butter you keep in your fridge. Instead, there’s a clear, amber liquid that seems to dance around ingredients without smoking or burning.
That’s clarified butter – essentially regular butter with all its troublesome parts removed. Think of it as butter’s more reliable cousin.

Regular butter contains about 80% fat, 15% water, and 5% milk solids. Those milk solids include proteins and sugars that give butter its characteristic taste, but they’re also what cause all the problems when you turn up the heat.
“The moment you heat regular butter past 350°F, those milk solids start to burn and turn bitter,” explains Chef Marcus Rivera, who runs three restaurants in Chicago. “Clarified butter can handle temperatures up to 485°F without breaking a sweat.”

When you make clarified butter, you’re essentially editing out everything that makes butter fragile. You melt it slowly, let the water evaporate, and skim off those troublesome milk solids. What’s left behind is pure, golden fat that behaves completely differently in your pan.
Why Professional Kitchens Can’t Live Without It
The difference between regular butter and clarified butter in a professional kitchen isn’t just about preventing smoke. It’s about consistency, control, and achieving results that simply aren’t possible with regular butter.

Here’s what makes clarified butter so valuable to chefs:
| Property | Regular Butter | Clarified Butter |
| Smoke Point | 350°F | 485°F |
| Water Content | 15% | 0% |
| Shelf Life (Room Temp) | Few hours | Several months |
| Splattering | High | None |
The higher smoke point means chefs can achieve that perfect sear on proteins without the fat breaking down. No water content means no splattering or steam that could interfere with browning. And the extended shelf life means they can make large batches without worry.
“I use clarified butter for everything from searing duck breast to finishing pasta,” says Chef Amanda Chen from her San Francisco restaurant. “It gives you this incredible glossy finish that makes every dish look restaurant-quality.”
But the benefits go beyond just practical cooking advantages:
- Creates perfectly even browning without hot spots
- Adds a subtle nutty flavor that enhances rather than masks ingredients
- Provides a luxurious mouthfeel that coats the palate
- Works beautifully for both savory and sweet applications
- Doesn’t separate or break when heated repeatedly
Making Clarified Butter at Home
The good news? Making clarified butter at home is surprisingly simple. You don’t need any special equipment or advanced techniques – just patience and attention.
Start with good quality unsalted butter. You’ll lose about 25% of the original weight in water and milk solids, so plan accordingly. If you want a cup of clarified butter, start with about 1.3 cups of regular butter.
Cut your butter into small, even pieces and place them in a heavy-bottomed saucepan. This ensures even melting and prevents hot spots that could cause burning.
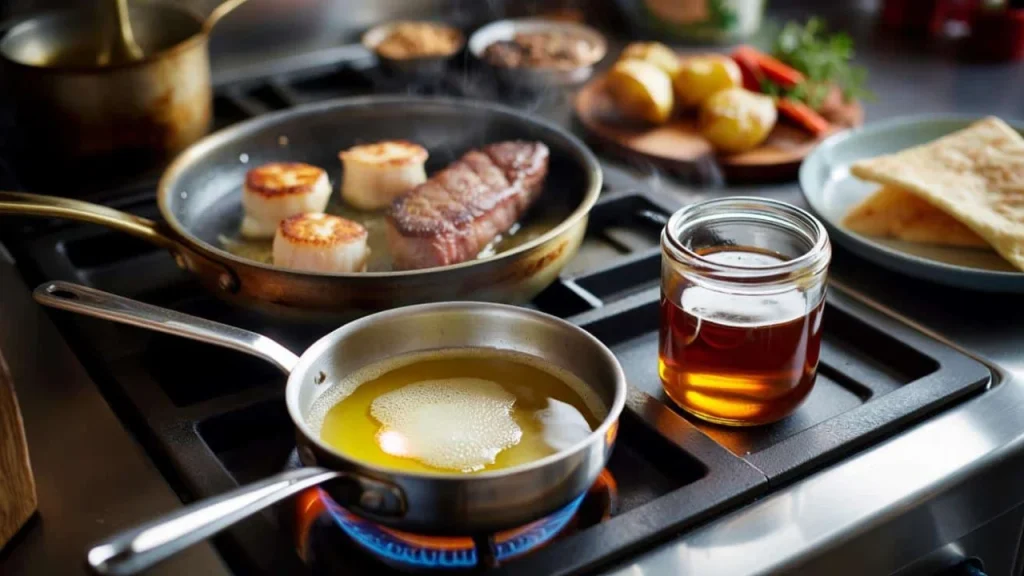
Set your heat to low – this is crucial. You want the butter to melt slowly and gently. As it melts, you’ll notice three distinct layers forming. The milk solids will rise to the top as a white foam, the clear golden fat will be in the middle, and any remaining water will settle at the bottom.
Here’s your step-by-step process:
- Melt butter slowly over low heat for 10-15 minutes
- Skim off the white foam that rises to the surface
- Continue cooking until bubbling stops (water has evaporated)
- Strain through cheesecloth or fine mesh strainer
- Store in an airtight container
“The key is patience,” notes culinary instructor David Park. “Rush the process and you’ll end up with brown butter instead of clarified butter – they’re two completely different things.”
Beyond the Professional Kitchen
While chefs have known about clarified butter for generations, home cooks are just beginning to discover its potential. Social media has played a huge role in this, with food influencers showcasing how clarified butter can transform everyday cooking.
The applications extend far beyond just searing proteins. Clarified butter works beautifully for:
- Roasting vegetables at high temperatures without burning
- Making perfect popcorn with a rich, buttery flavor
- Creating flaky, golden pastries and baked goods
- Finishing soups and sauces for added richness
- Grilling and barbecuing without flare-ups
Many health-conscious cooks appreciate that clarified butter is lactose-free, since the milk solids (which contain lactose) are removed during the clarification process. This makes it suitable for people with lactose sensitivity who still want to enjoy butter’s flavor.
“I started making clarified butter because my daughter is lactose intolerant,” shares home cook Jennifer Walsh. “Now I use it for everything because it just performs better than regular butter in so many situations.”
The storage benefits alone make it worthwhile for many home cooks. While regular butter needs refrigeration and has a relatively short shelf life, clarified butter can be stored at room temperature for months without spoiling, making it incredibly convenient for daily cooking.
FAQs
How long does homemade clarified butter last?
When stored properly in an airtight container, clarified butter can last 3-4 months at room temperature or up to a year in the refrigerator.
Is clarified butter the same as ghee?
They’re very similar, but ghee is cooked slightly longer until the milk solids brown, giving it a nuttier flavor and deeper color.
Can I use clarified butter for baking?
Yes, but results may differ slightly from regular butter since there’s no water content to create steam for leavening.
Why does my clarified butter look cloudy?
Cloudiness usually means some milk solids remain – strain it again through a finer mesh or cheesecloth.
Can I make clarified butter from salted butter?
You can, but the salt will become more concentrated as the water evaporates, potentially making your dishes too salty.
What’s the best way to strain clarified butter?
Use a fine-mesh strainer lined with cheesecloth, or coffee filters work well too – just pour slowly and let gravity do the work.