Sarah stared out her frosted window at the empty vegetable beds, their bare soil covered in a thin layer of snow. Just three months ago, those same beds had been bursting with tomatoes, peppers, and her pride and joy – a row of sweet potatoes that had finally given her a decent harvest after years of disappointment.

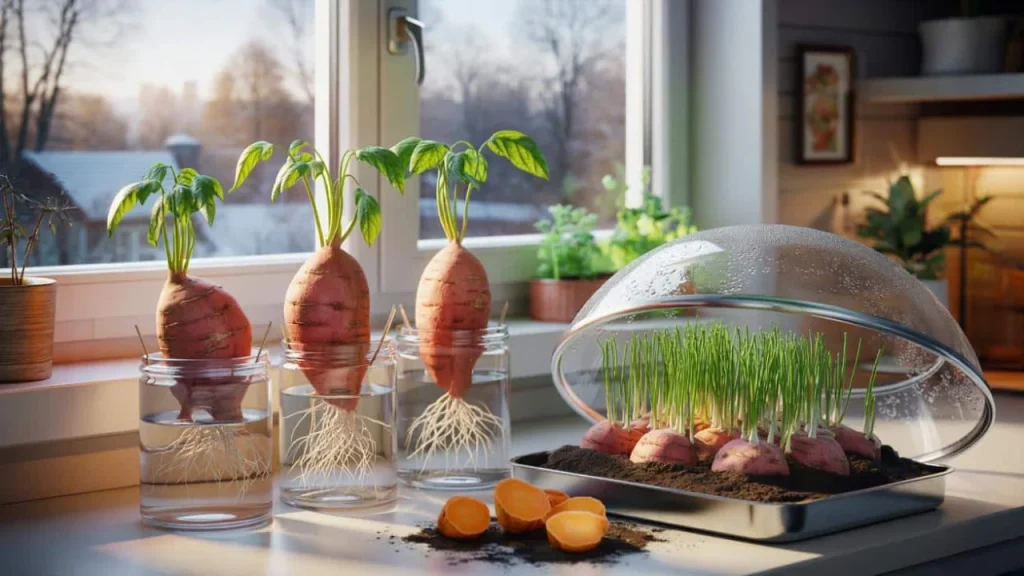
This year would be different, though. While her neighbors were flipping through seed catalogs and dreaming of spring, Sarah had already started her secret weapon. Three sweet potatoes sat half-submerged in mason jars on her sunny windowsill, tiny green shoots beginning to emerge from their surfaces.
She wasn’t alone in this winter ritual. Across the country, gardeners have discovered that sprouting sweet potatoes during the coldest months gives them a massive head start when growing season finally arrives.

Why Winter Sprouting Changes Everything
Sweet potatoes need a long, warm growing season to develop properly. In most temperate climates, that window is frustratingly short. You plant in May, cross your fingers through a cool summer, and often end up with disappointing, undersized tubers come fall.
But sprouting sweet potatoes indoors changes the game completely. Instead of waiting until soil temperatures warm up to start the growing process, you’re giving your plants a 6-8 week head start.

“Most people don’t realize that sweet potatoes aren’t grown from seeds or even from planting the tuber itself,” explains Master Gardener Rebecca Chen. “We grow them from slips – those little leafy shoots that sprout from the potato. The earlier you start these slips, the stronger your plants will be.”
The process is surprisingly simple. Sweet potatoes naturally want to sprout when given warmth and moisture. During winter, your heated home provides the perfect environment for encouraging this growth while outdoor conditions remain hostile.

Getting Your Sweet Potatoes Ready to Sprout
Success starts with choosing the right sweet potatoes. Not every tuber from the grocery store will cooperate, so picking the right candidates matters.
Here’s what to look for when selecting sweet potatoes for sprouting:

- Firm, unblemished skin with no soft spots or cuts
- Organic varieties when possible (less likely to be treated with sprouting inhibitors)
- Medium-sized tubers (easier to handle and sprout more reliably)
- Visible “eyes” or small dark spots on the skin
- Sweet potatoes that have been stored at room temperature for at least a week
Avoid sweet potatoes that have been refrigerated, as cold storage can damage their ability to sprout. Those perfect-looking tubers in the grocery store’s refrigerated section might look appealing, but they’re often duds when it comes to sprouting.
“I always buy my sprouting sweet potatoes from farmers markets or stores that keep them at room temperature,” notes urban gardener Mike Rodriguez. “The slightly wrinkled ones that don’t look perfect for eating are often the best sprouters.”
| Sprouting Method | Time to First Shoots | Success Rate | Best For |
|---|---|---|---|
| Water Method (jars) | 2-3 weeks | High | Beginners |
| Soil Method (trays) | 3-4 weeks | Medium-High | Large quantities |
| Sand Method (boxes) | 2-4 weeks | Very High | Professional growers |
| Heat Mat Method | 1-2 weeks | High | Quick results |
The Simple Water Method That Actually Works
The most popular method for sprouting sweet potatoes involves nothing more than mason jars, water, and toothpicks. It’s the same technique many of us learned in elementary school with regular potatoes, but it works beautifully for sweet potatoes too.
Start by washing your sweet potato gently, being careful not to scrub off any potential growth points. Insert three or four toothpicks around the middle of the potato, then suspend it in a jar with the pointed end down. Add enough water to submerge the bottom half of the tuber.
Place your jars in a warm, bright location – a sunny windowsill works perfectly. The key is maintaining consistent warmth. Sweet potatoes sprout best when temperatures stay between 75-85°F consistently.
“I keep mine on top of my refrigerator where it’s naturally warmer,” shares gardening blogger Jennifer Park. “Within two weeks, I usually see the first tiny shoots poking out.”
Change the water every few days to prevent bacterial growth. Don’t worry if the water gets a bit cloudy – that’s normal as the potato begins to break down slightly and release nutrients.
What to Expect During the Sprouting Process
Patience is essential during the first few weeks. Sweet potatoes can take anywhere from 10 days to a month to show their first signs of life, depending on the variety and storage conditions.
The first sign of success is usually small bumps or swellings appearing on the skin. These quickly develop into tiny green or purple shoots that gradually unfurl into leaves. Don’t be surprised if roots also start growing from the bottom of the tuber – this is perfectly normal and actually a good sign.
As shoots develop, they’ll grow rapidly under the right conditions. Within 4-6 weeks, you should have multiple slips that are 4-6 inches tall with several leaves each. This is when the real magic happens – you get to harvest your slips.
To harvest slips, gently twist and pull them from the mother tuber when they’re 4-6 inches long. Each slip should come away with some roots attached. If a slip doesn’t have roots, place it in a glass of water for another week or two until roots develop.
Timing Your Indoor Sprouting for Outdoor Success
The timing of your sprouting schedule depends entirely on your local climate and last frost date. Sweet potatoes are extremely frost-sensitive, so they can’t go outside until soil temperatures consistently stay above 60°F and nighttime temperatures don’t drop below 55°F.
For most temperate regions, this means starting your sprouting process in January or February for a May or June transplant date. Check your local extension office for specific recommendations in your area.
“I start my sweet potatoes right after New Year’s,” explains commercial grower Tom Martinez. “By the time our soil is ready in late May, I have strong, well-rooted slips that can handle the transition outdoors.”
Once you have rooted slips, they’ll need to be gradually hardened off before transplanting – just like any other seedling. Start by moving them outside for a few hours each day, gradually increasing their outdoor time over 7-10 days.
Troubleshooting Common Sprouting Problems
Not every sweet potato will cooperate, even under ideal conditions. Some common issues include tubers that rot instead of sprouting, extremely slow growth, or weak, spindly shoots.
If a sweet potato starts to rot, remove it immediately and start over with a fresh tuber. Rot spreads quickly and can contaminate your setup. Sometimes changing the water more frequently helps prevent this issue.
For slow or weak growth, try moving your setup to a warmer location or adding bottom heat with a seedling heat mat. Sweet potatoes really respond to consistent warmth – even a few degrees can make a big difference in sprouting success.
FAQs
Can I use sweet potatoes from the grocery store for sprouting?
Yes, but organic varieties work best since they’re less likely to be treated with sprouting inhibitors.
How many slips will one sweet potato produce?
A healthy sweet potato typically produces 8-12 slips, though this varies by size and variety.
Do I need special equipment to start sprouting sweet potatoes?
No, just mason jars, toothpicks, and water. A heat mat can speed things up but isn’t necessary.
When should I start sprouting for my area?
Start 8-10 weeks before your last expected frost date to have slips ready for transplanting.
What if my sweet potato doesn’t sprout at all?
Some tubers just won’t sprout due to variety or storage conditions. Try a different sweet potato if nothing happens after 4 weeks.
Can I keep sprouting the same sweet potato for multiple harvests?
Yes, a single tuber can often produce multiple rounds of slips over several months if kept healthy.