Sarah stared at her living room wall, coffee mug in hand, feeling utterly defeated. After carefully taking down all her holiday decorations, she’d impulsively grabbed a pair of pliers and started yanking out the old wall plugs left behind from previous tenants. What should have been a quick cleanup had turned into a disaster zone of crumbling plaster and gaping holes that looked like miniature moon craters.

She wasn’t alone in this predicament. Every year, thousands of homeowners face the same frustrating reality when refreshing their walls or moving furniture around. Those innocent-looking plastic plugs seem harmless enough until you try to remove them.
The good news? There’s a surprisingly simple method that professional decorators use to achieve clean wall plug removal without leaving a trace. It doesn’t require expensive tools or years of experience – just a different approach that works with the plug’s design instead of against it.

Why Your Current Method Destroys Your Walls
Most people approach wall plug removal like they’re pulling a splinter – grip it tight and yank it out fast. This instinct couldn’t be more wrong. Wall plugs are specifically engineered to resist removal, and fighting that design head-on usually means your wall pays the price.
“Wall plugs are designed to expand and grip the inside of the hole when a screw is inserted,” explains professional handyman Marcus Chen. “When you pull straight out, you’re fighting against that expansion mechanism while putting all the stress on the brittle plaster around it.”

The result is always the same: chipped paint, enlarged holes, and sometimes even hairline cracks that spread beyond the original fixing point. What started as a simple refresh project suddenly requires patching, sanding, priming, and repainting entire wall sections.
Different types of wall plugs create different problems when removed incorrectly:

- Standard nylon plugs split and leave fragments buried in the hole
- Metal cavity anchors can collapse the plasterboard behind them
- Heavy-duty plugs often take chunks of masonry with them
- Older plugs become brittle and shatter into multiple pieces
The Professional Trick That Changes Everything
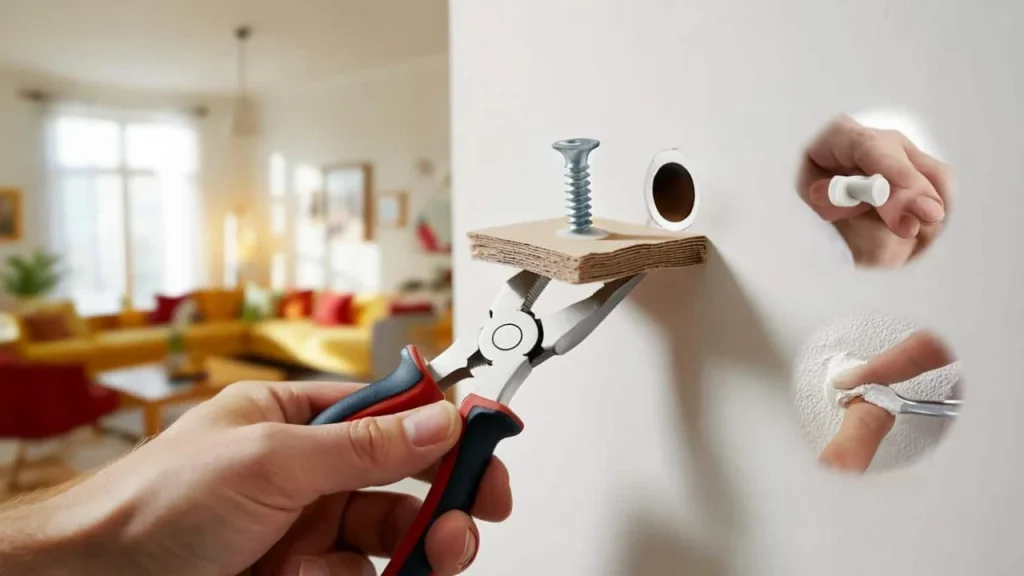
The secret isn’t about having stronger tools or better technique – it’s about giving yourself something proper to grip. Professional decorators never try to remove wall plugs directly. Instead, they create a temporary “handle” using a simple screw.
This method works because it reverses the plug’s expansion mechanism. When you insert a screw partway into the plug, you can control exactly how much grip the plug has on the wall. Remove the screw slightly, and the plug loosens its hold. Add gentle pulling force, and it slides out cleanly.
| Tool | Purpose | Alternative |
|---|---|---|
| Compatible screw | Creates pulling handle | Sturdy nail or bradawl |
| Flat-nose pliers | Grips screw head securely | Adjustable wrench |
| Screwdriver | Controls screw depth | Power drill on low speed |
| Ready-mixed filler | Fills remaining hole | Toothpaste for tiny holes |
“The beauty of this method is that you’re working with the plug’s design, not against it,” notes interior designer Rachel Thompson. “You can feel exactly when the plug starts to release its grip.”
Step-by-Step Process for Invisible Results
Start by selecting a screw that fits snugly into the wall plug opening. It doesn’t need to be the original screw – any compatible size will work. Insert the screw by hand until you feel it engage with the plug material, but don’t overtighten it.
Now comes the crucial part: instead of pulling immediately, back the screw out about half a turn. This partially collapses the plug’s expansion mechanism while still giving you something solid to grip.
Grip the screw head with your pliers and apply steady, gentle pressure directly outward from the wall. You’re not yanking or jerking – just maintaining consistent tension while slowly working the plug free.
Most plugs will start moving within 10-15 seconds of steady pressure. Once you feel initial movement, continue the gentle pulling motion until the plug slides completely free.
For stubborn plugs, try this variation: insert the screw deeper, then back it out a full turn before pulling. This creates more space for the plug material to collapse inward.
What This Means for Your Home Projects
This technique transforms wall plug removal from a destructive process into a virtually invisible one. The original drilled hole remains clean and properly sized, requiring only basic filler and touch-up paint.
The time savings are remarkable. Instead of spending weekend afternoons patching large damaged areas, you can complete wall plug removal and filling in minutes per hole. Most small holes disappear completely after a light sand and single coat of matching paint.
“I used to dread taking anything down from my walls because I knew it meant a major repair job,” says homeowner Jennifer Walsh. “Now I can rearrange my gallery wall whenever I want without worrying about the aftermath.”
This method works equally well on various wall types:
- Painted plasterboard walls (most common residential application)
- Solid masonry walls with nylon plugs
- Older lath-and-plaster walls
- Cavity walls with metal anchors
The key is adjusting your screw depth and pull pressure based on the plug type and wall material. Softer walls need gentler pressure, while solid masonry can handle more aggressive removal.
Professional decorators estimate this method reduces wall damage by over 90% compared to direct pulling techniques. It also eliminates the need for specialized removal tools or expensive repair compounds.
“Once you master this technique, you’ll wonder why anyone ever tries to remove plugs any other way,” adds contractor David Morrison. “It’s one of those simple solutions that makes you feel like a genius.”
FAQs
What if I don’t have a screw that fits the wall plug?
Try a sturdy nail, bradawl, or even a thick corkscrew. The key is having something that engages with the plug material to create a pulling point.
Can this method work on really old or brittle plugs?
Yes, but go slower and use less screw depth. Older plugs often need more gentle coaxing, but the principle works the same way.
What if the plug breaks apart during removal?
Remove the visible pieces first, then use a thin nail to fish out any remaining fragments from inside the hole before filling.
How do I know if a wall plug is too damaged to remove cleanly?
If the plug opening is severely enlarged or cracked, focus on gentle removal of pieces rather than trying to extract it whole.
Is special filler needed for the remaining holes?
Standard ready-mixed filler works perfectly for most applications. Only deep holes in high-stress areas need specialized compounds.
Can I reuse the holes for new fixings?
Clean holes can often accommodate new plugs of the same size, but fresh holes usually provide better holding power.